Faster from 3D to 2D in SketchUp
Discover how ConDoc Tools helps you generate 2D working documents and presentations effectively and efficiently.
Save hours of time when documenting 2D drawings to scale
Some SketchUp tools make their purpose immediately clear. Take Bevel, for rounding or chamfering edges. Or CabN8: something to do with drawing cabinets, right? But some tools don’t give much away at first glance. ConDoc Tools is probably one of them. Though… Con… Doc… Construction Documents. Of course! ConDoc Tools is what you use to document and present your 3D SketchUp model at lightning speed in LayOut.
In this blog, we walk through the benefits of using two different workflows, both producing scaled 2D drawings of a series of rooms. And it’s a double blog! On one side, we follow Orlando’s traditional SketchUp approach. On the other hand, we follow Martha, who uses ConDoc Tools. Both reach the same destination, but which workflow suits you best?
Orlando’s way: old school
I’ve known SketchUp for a long time, since 2002. I know all the features you need to turn a 3D model into proper documentation that explains your design to others.
I never really kept up with all the extensions you can buy nowadays. I know there are some useful ones out there, but I’d rather just do things the way I’ve always done them.
I know LayOut and can use it to create scaled 2D views from my 3D SketchUp model. Before I get to LayOut, though, I need to prepare my SketchUp file. That’s quite a job, honestly, and for a beginning SketchUp user, it’s not always straightforward either.
In short, here are the steps involved:
In SketchUp:
- Create objects from geometry
- Tag the groups
- Create section planes
- Set the display style
- Set up the view
- Make sure the right tags are visible
- Create the scenes
- Send model to LayOut
In LayOut:
- Choose a template
- Fill in fixed project details
- Set the correct scene
- Set the correct scale
- Set the correct crop
- Place annotations
- Add a new page
- Etc.
Let’s go!
Martha’s way: ConDoc Tools
I haven’t known SketchUp quite as long as Orlando, but still well over 17 years! Alongside mastering SketchUp’s built-in features, I have a strong interest in programming, which means I keep a close eye on SketchUp extensions. There’s always something worth adding to the toolbox.
ConDoc Tools is exactly that kind of tool. And even though I only need to produce SketchUp documentation occasionally, I’m genuinely impressed by the level of automation it brings.
Do you find yourself repeating the manual process Orlando described, project after project? Then ConDoc Tools was made for you.
I documented the same building as Orlando for this example, but using ConDoc Tools. Because so many of the steps happen automatically, it goes much faster than Orlando’s method.
In short, here are my steps:
In SketchUp:
- Enable the ConDoc Tools system and set how many floors the building has
- Create objects from geometry. I usually do this as I draw
- Tag objects using the ConDoc Tools system. Again, I do this as I go, while drawing, but it can also be done afterwards
- Prepare the presentation: select floor plans, sections, and elevations in ConDoc Tools
- Send model to LayOut
In LayOut:
- Drag Views from your Scrapbook into your Layout
- Fill in fixed project details
- Place annotations
- Add a new page
That’s it!
SketchUp – Step 1
Orlando: Grouping geometry
Grouping geometry is workflow-independent; it has to happen regardless. If you skip it, controlling the visibility of different parts of your model later becomes a real headache.
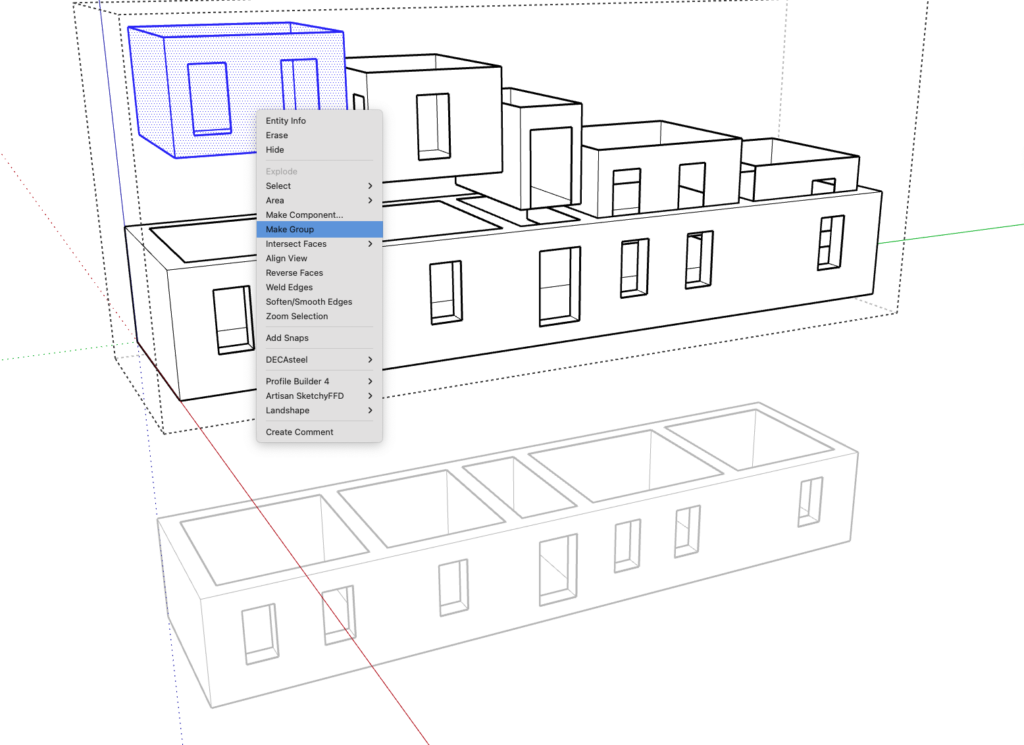
I make it a habit to give components and groups a name. It’s not just useful while modelling: that name will also appear automatically next to a label arrow in LayOut later on!
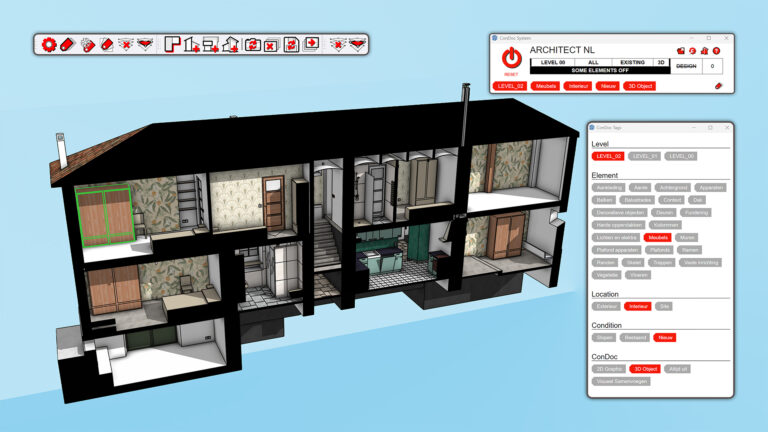
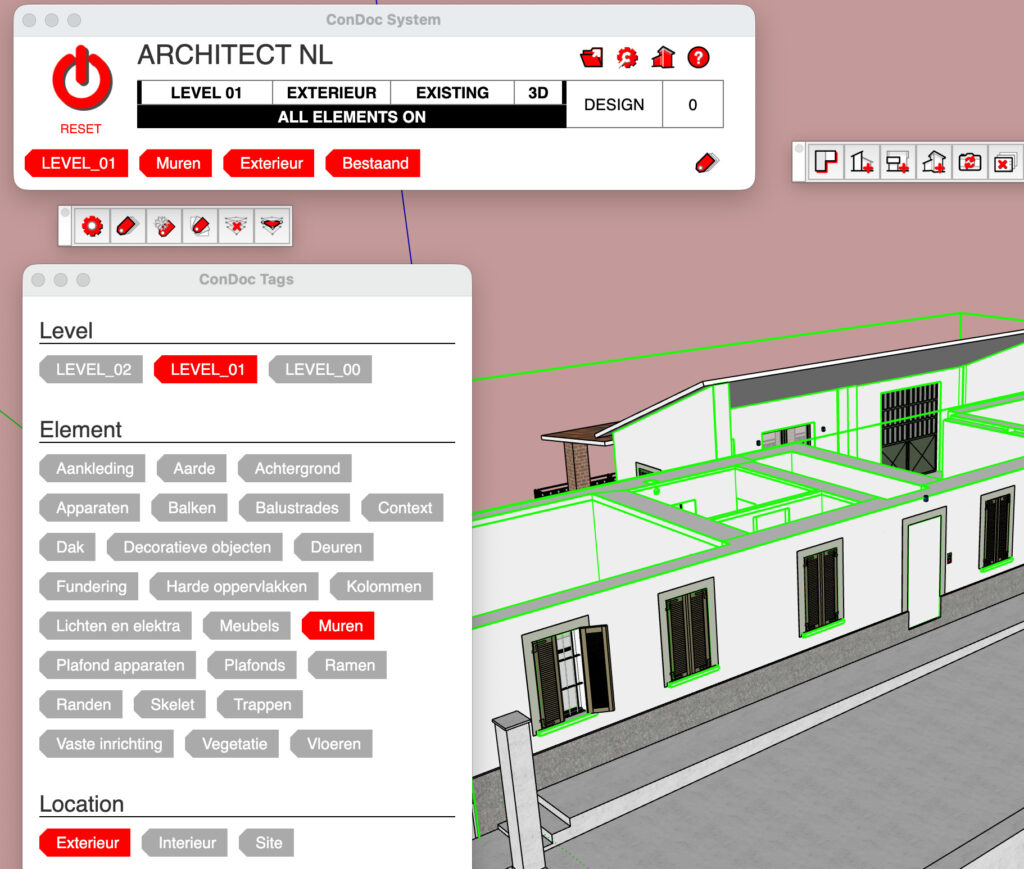
Martha: Enabling the ConDoc system
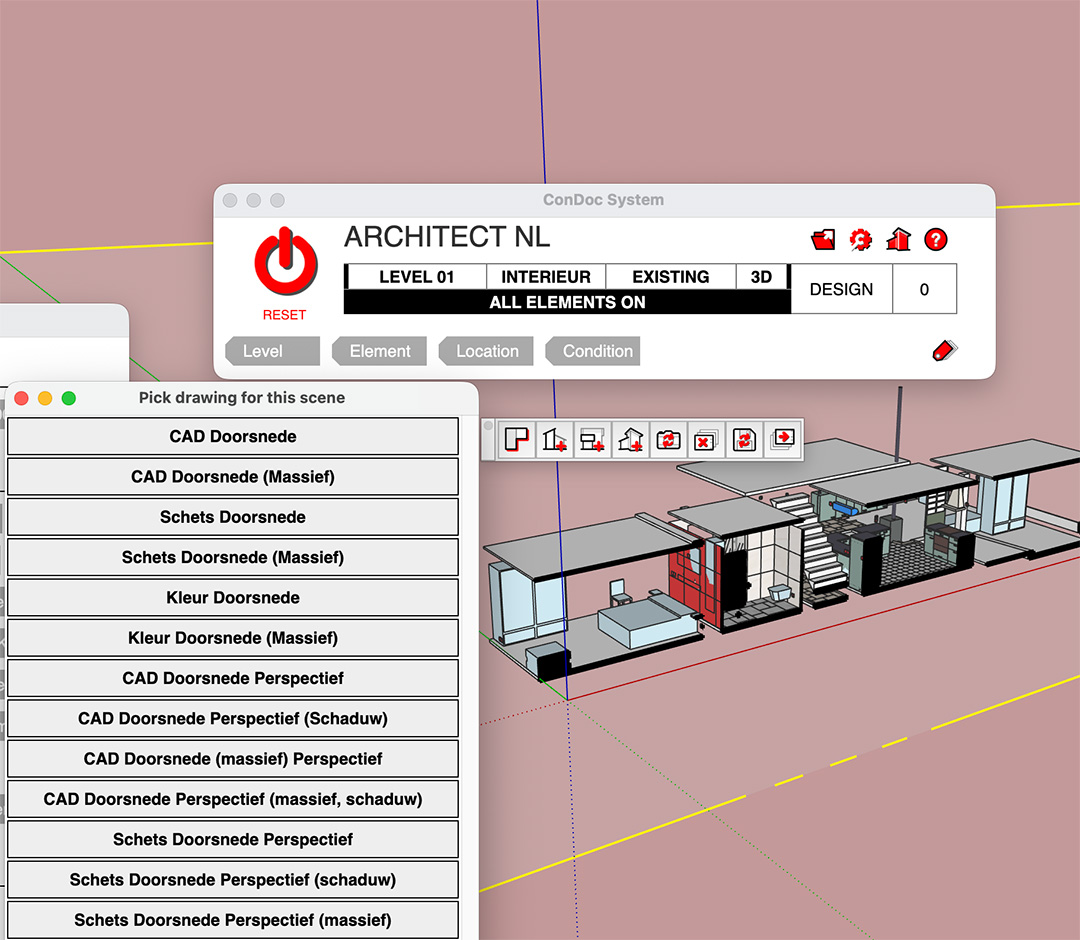
I click the ConDoc System button. The ConDoc system window opens. I can see the title ‘Architect NL’, which is a set of tags and settings with my preferred configuration loaded in. If I want to switch to a different set, I click the folder icon to load one.

Once the system is active, I can instantly spot any untagged elements because they display with dashed lines.

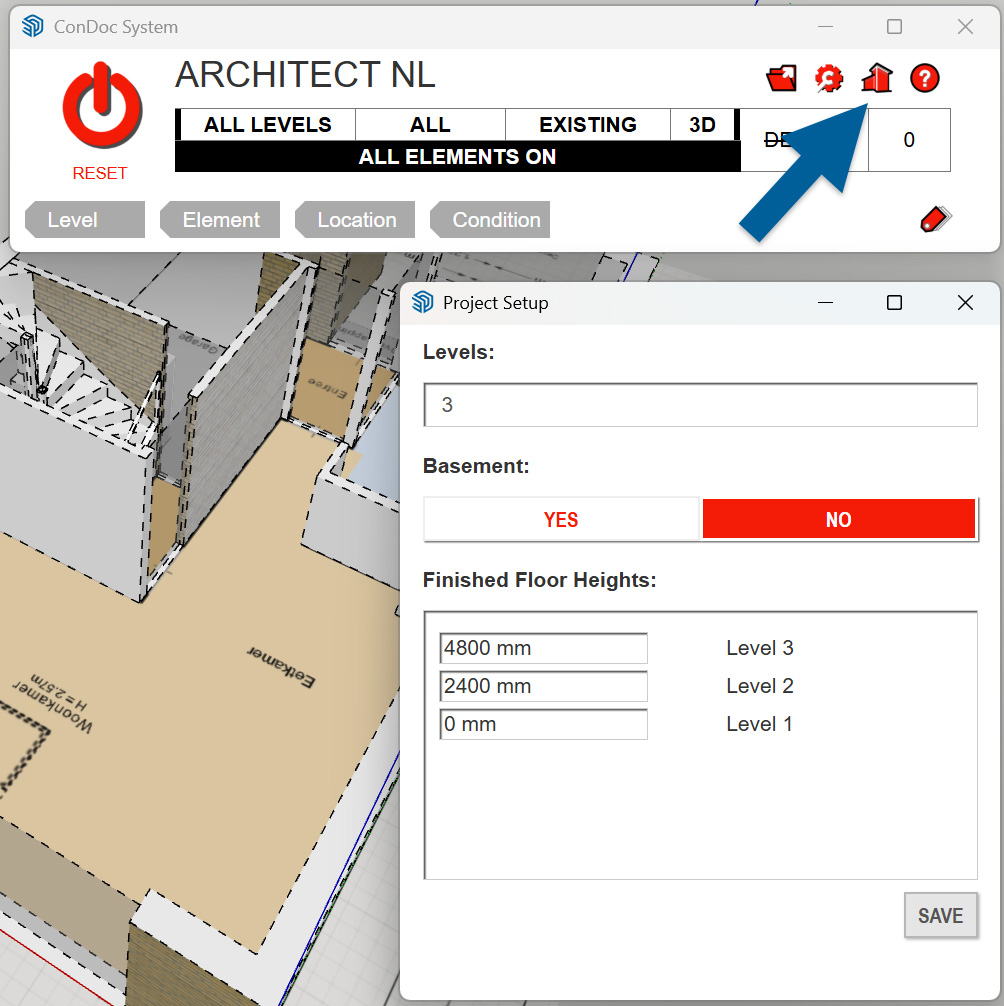
Then I click the house icon to set how many floors my building has and what the floor heights are. ConDoc uses this information later to automatically place the floor plan sections at the correct height.
SketchUp – Step 2
Orlando: Tagging objects
I tag everything by hand. First, I decide which tags I need, then I assign them. Because every project is different, I don’t save tags in my SketchUp template. For this project, I create tags like ‘first floor’, ‘second floor’, ‘electrical’, ‘air conditioning’, and ‘furniture’. One limitation of SketchUp is that an object can only have one tag. You can nest groups, a group inside a group, and assign different tags at each level. But the hierarchy is determined by the nesting, so isolating all the sockets on the first floor to count them, for example, isn’t straightforward. You’d need two separate tags: ‘socket floor 1’ and ‘socket floor 2’.
Martha: Creating objects from geometry
For ConDoc Tools, it’s a good idea to keep your geometry clean and turn it into components. The same principle applies as in the traditional workflow: naming things properly matters. It keeps your model organised and makes the LayOut tools work more effectively.
SketchUp – Step 3
Orlando: Creating section planes
Once all groups are tagged, I go through the rooms one by one and create a section plane for each.
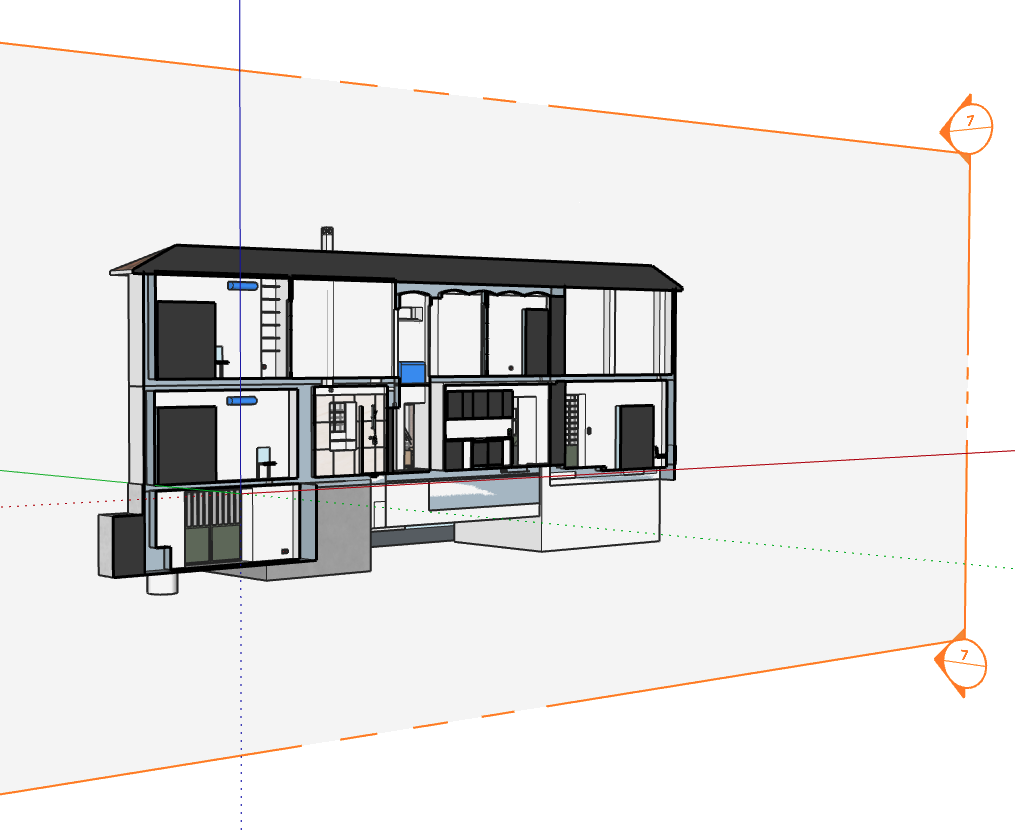
As the project grows, section planes start to pile up fast:

So choosing the right display style at this point becomes important.
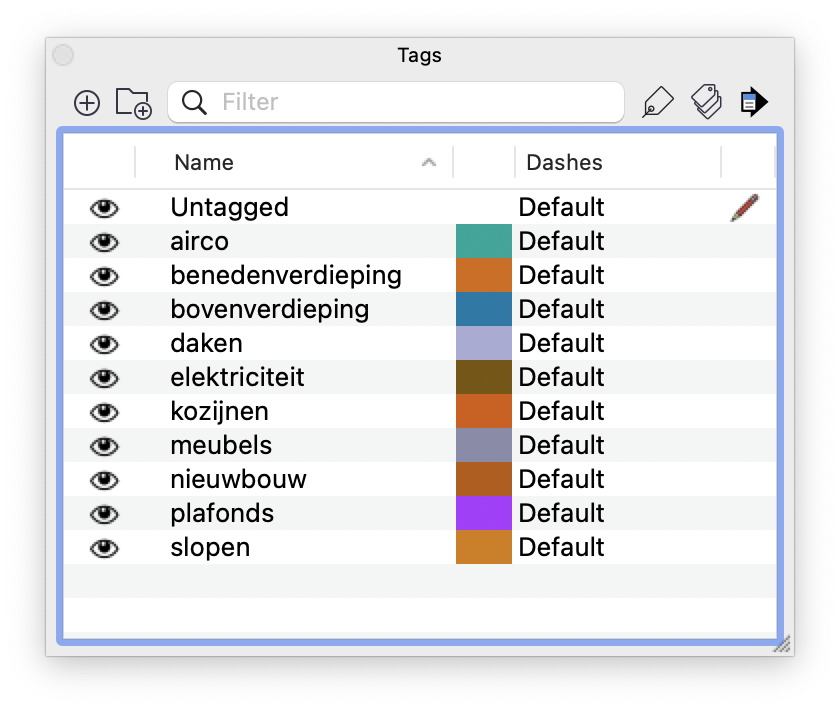
Martha: Tagging objects
In ConDoc Tools, tagging components is quick and structured. The ConDoc system works on the assumption that every object in a building has four properties:
- Floor level
- Element type
- Location
- Status (new / existing / to be demolished)
I go through all the objects in my model and classify them using this system. Each object gets at least one tag per property. Some objects get multiple tags of the same type. A staircase running from the ground floor to the first floor, for instance, gets both the ‘level 01’ and ‘level 02’ tags.
SketchUp – Step 4
Orlando: Setting the display style
I want to see the section cut, but not the section plane itself or any fill. Textures aren’t needed either; black and white is fine. That kind of decision defines the style, and I set it once for the entire file.
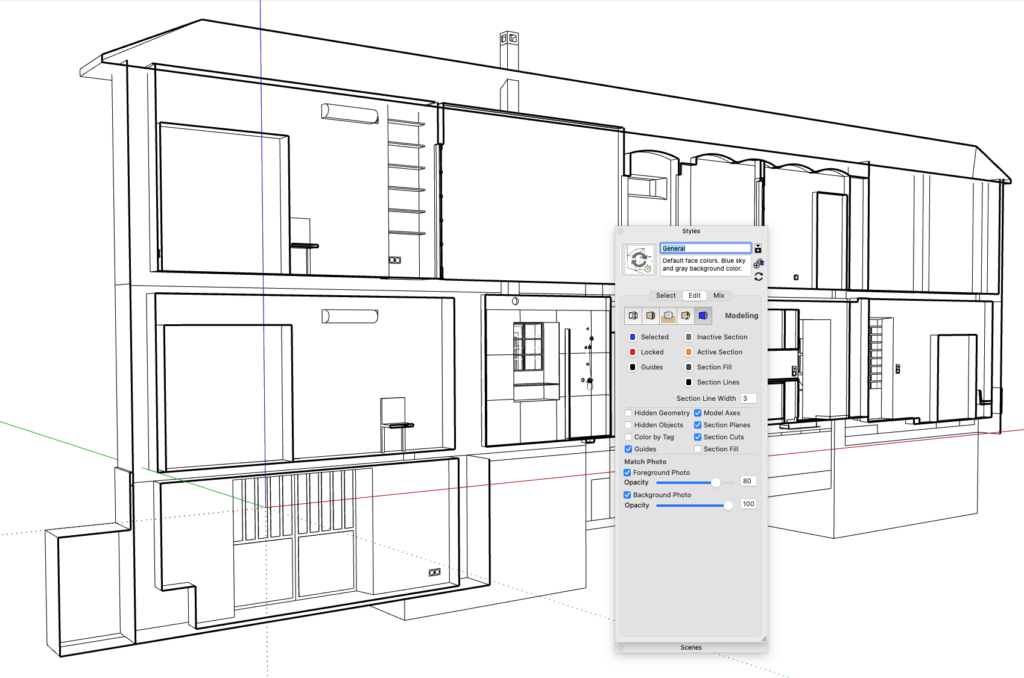
Once I’m happy with the look, I rename the style to ‘Section’ so I can easily find and reapply it for the next section plane.
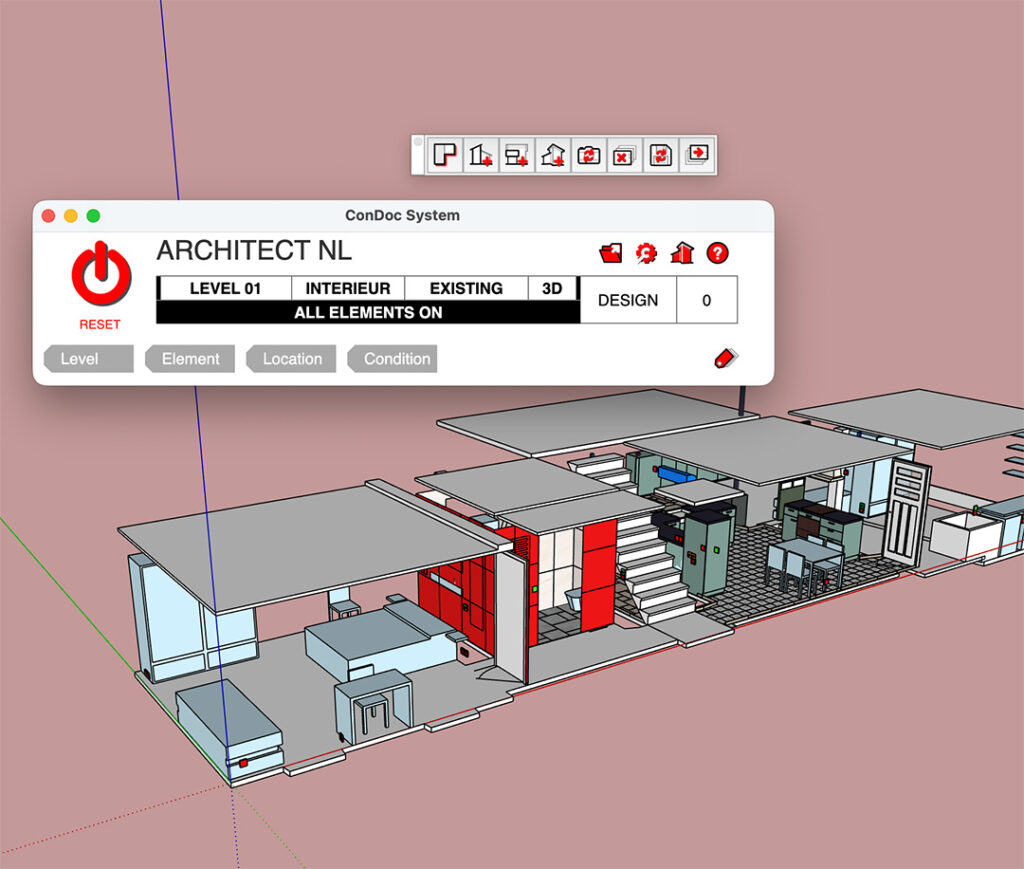
Martha: Using filters (optional)
Once all objects are tagged, I like to use the filters to inspect my model. For example, I’ll switch off all exterior walls and surroundings by filtering for ‘interior’:
SketchUp – Step 5
Orlando: Setting up the view
Next, I frame exactly what I want to show. That means zooming in on the room and choosing the right view (front). Perspective can be turned off at this point, too.
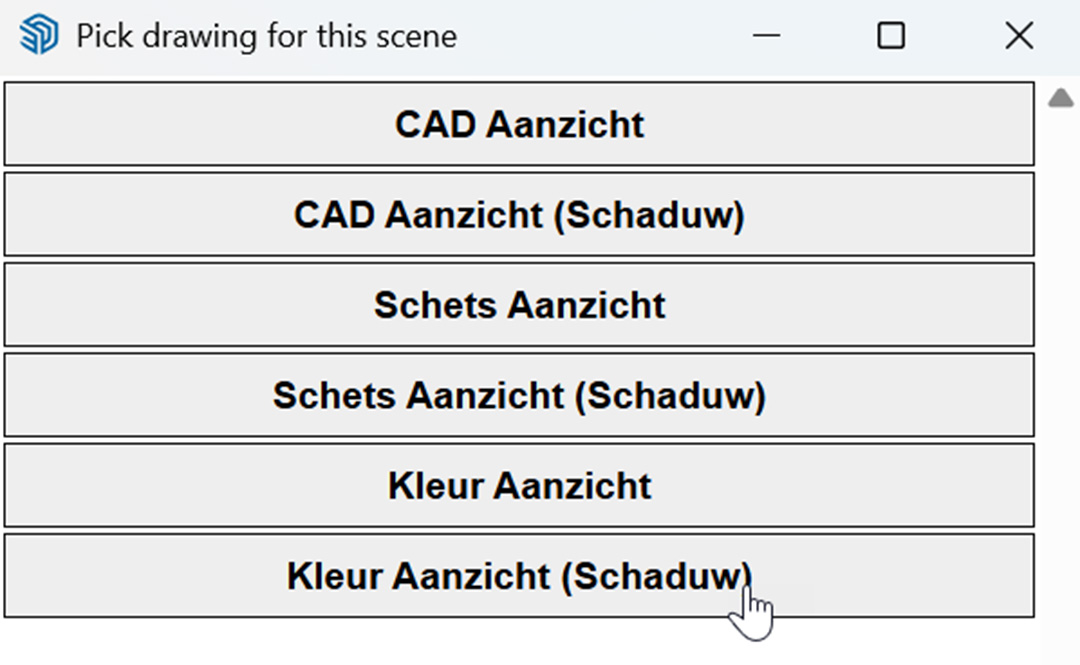
Martha: Preparing the presentation
The ConDoc Drawings toolbar starts with four tools I use to prepare my presentation.
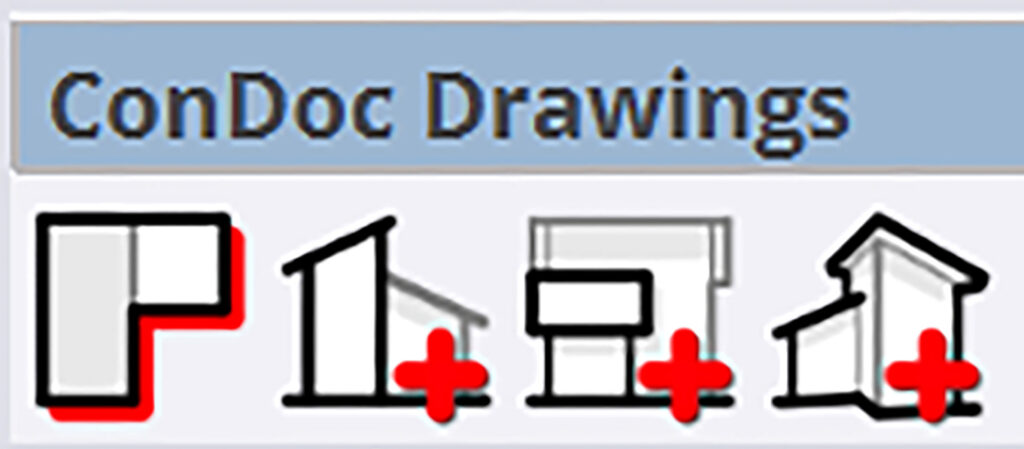
A. Floor plans
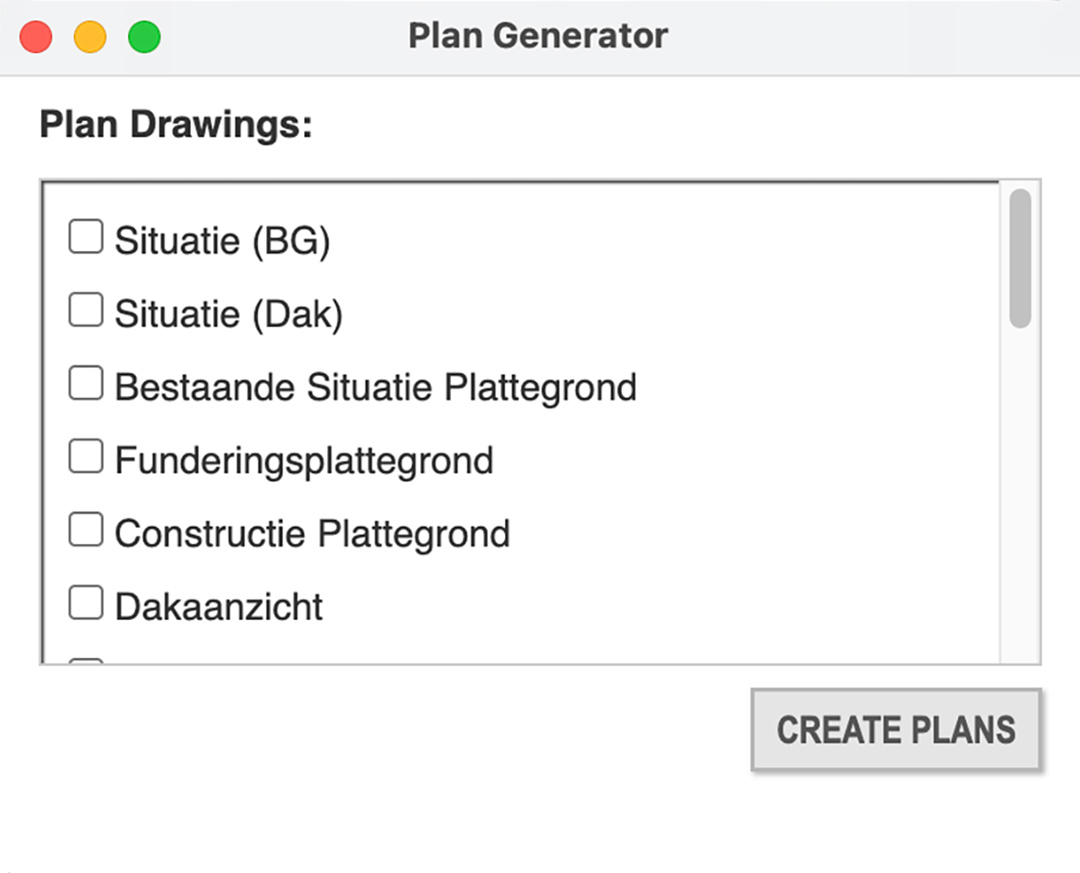
With the Plan Generator, a single click generates floor plans for every level. I usually only need the construction floor plan, but occasionally I’ll use others from the list. What’s visible on each drawing type is configured through the settings button (the key with the gear icon) in the main window.

For each floor plan, ConDoc creates multiple scenes. When you export to LayOut in the next step, they’re stacked up neatly on top of each other.
B. Sections
Next, I place a number of sections. For this building, I chose two longitudinal sections and four cross-sections. ConDoc automatically displays these in parallel projection and generates multiple scenes per section, just like it did for the floor plans. Which elements are shown depends on the drawing style I assign to each section:
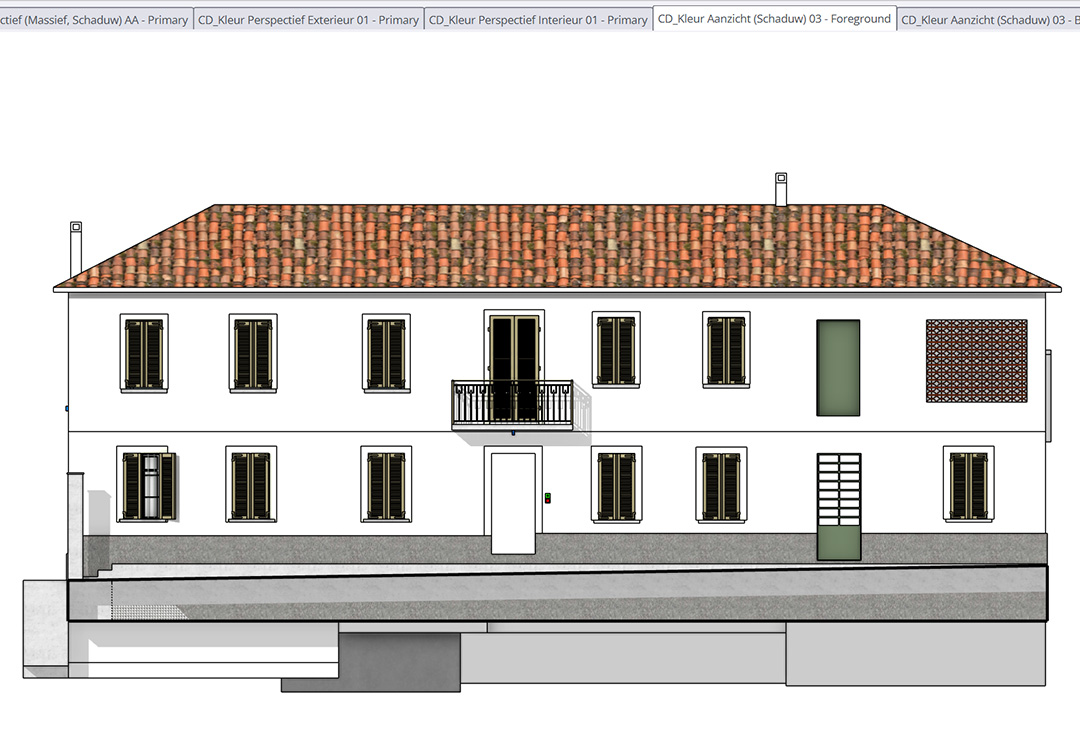
C. Elevations
I place the elevations of all facades using the ‘Elevation’ tool. I click on the facade I want to show, and ConDoc places a section plane 1.5 metres away from it. It then creates a view of that section in the style I select from the pop-up:
D. Perspectives
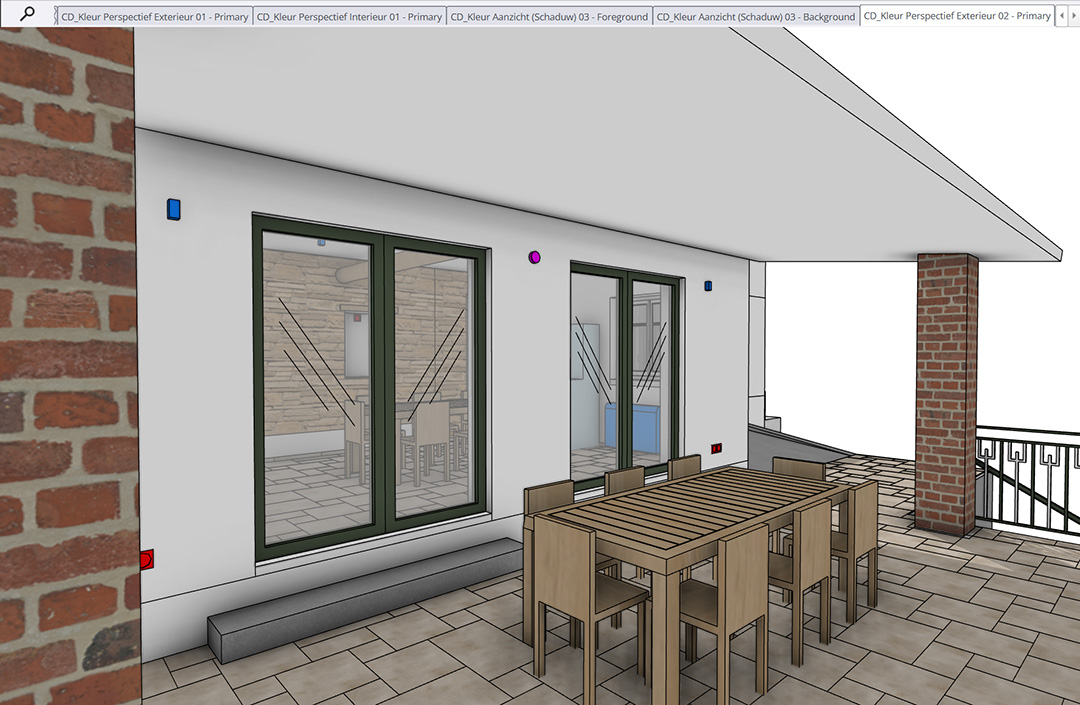
You could argue this tool isn’t strictly necessary in the ConDoc set, since it essentially captures the view just like you would in SketchUp. The real benefit is how easily you can set the style. Even starting from a view like this:
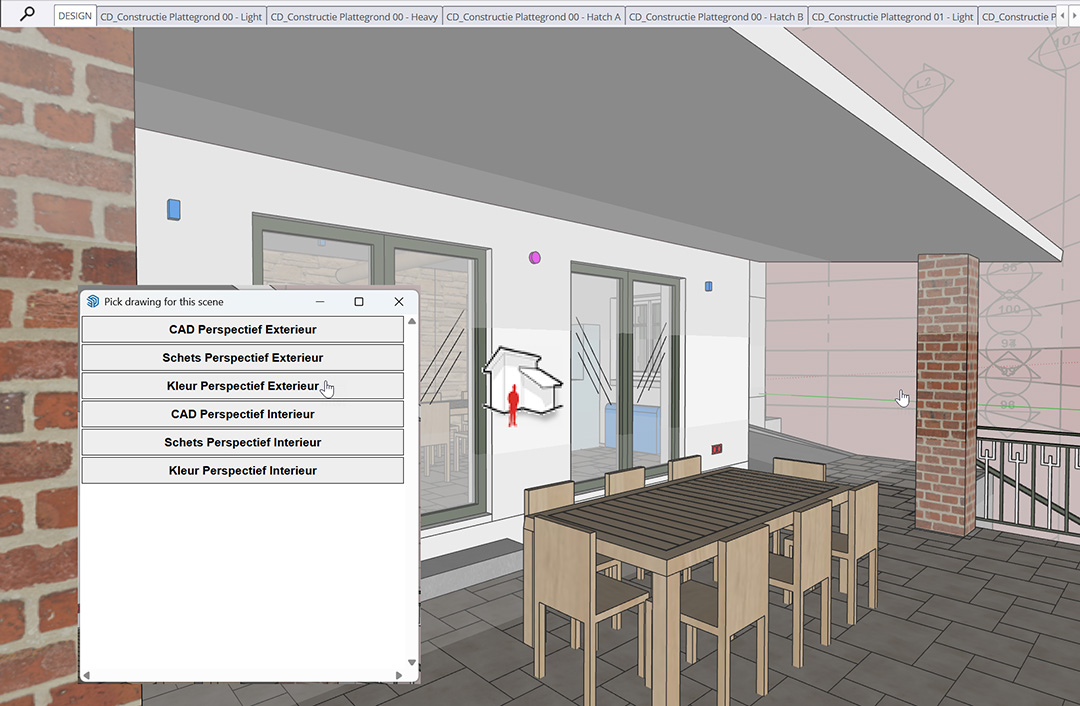
I end up with a clean result like this:
SketchUp – Step 6
Orlando: Making sure scenes show the right tags
The furniture and shelving aren’t needed, so I turn off the Furniture tag. If anything else appears that I don’t want, I’ll hide it manually by clicking it and pressing CMD-E. Yep, Mac user here!
Martha: Final corrections
After setting everything up, I sometimes still need to make a small adjustment. A table that accidentally got the ‘walls’ tag instead of ‘furniture’, for example. Oops! Easy to fix. The one thing I do need to remember is to click the ‘Scene update and save’ button afterwards to push that change through to all scenes.

SketchUp – Step 7
Orlando: Creating scenes
Now it’s time to lock in this view, both so I can easily return to it later and so I can link it to a viewport in LayOut.
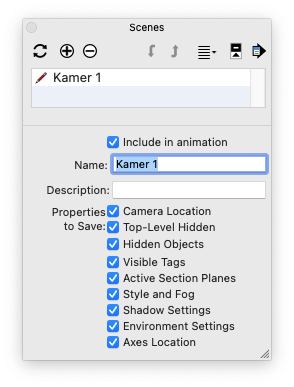
Getting the remaining rooms set up is fairly straightforward from here, but it does take some time. Three or four section planes per room, adjusting until the view looks right, hiding tags or objects where needed, and creating a new scene each time. Just don’t forget to update scenes whenever something changes.
All rooms are done. Now it’s time to save the file one last time before sending it to LayOut.
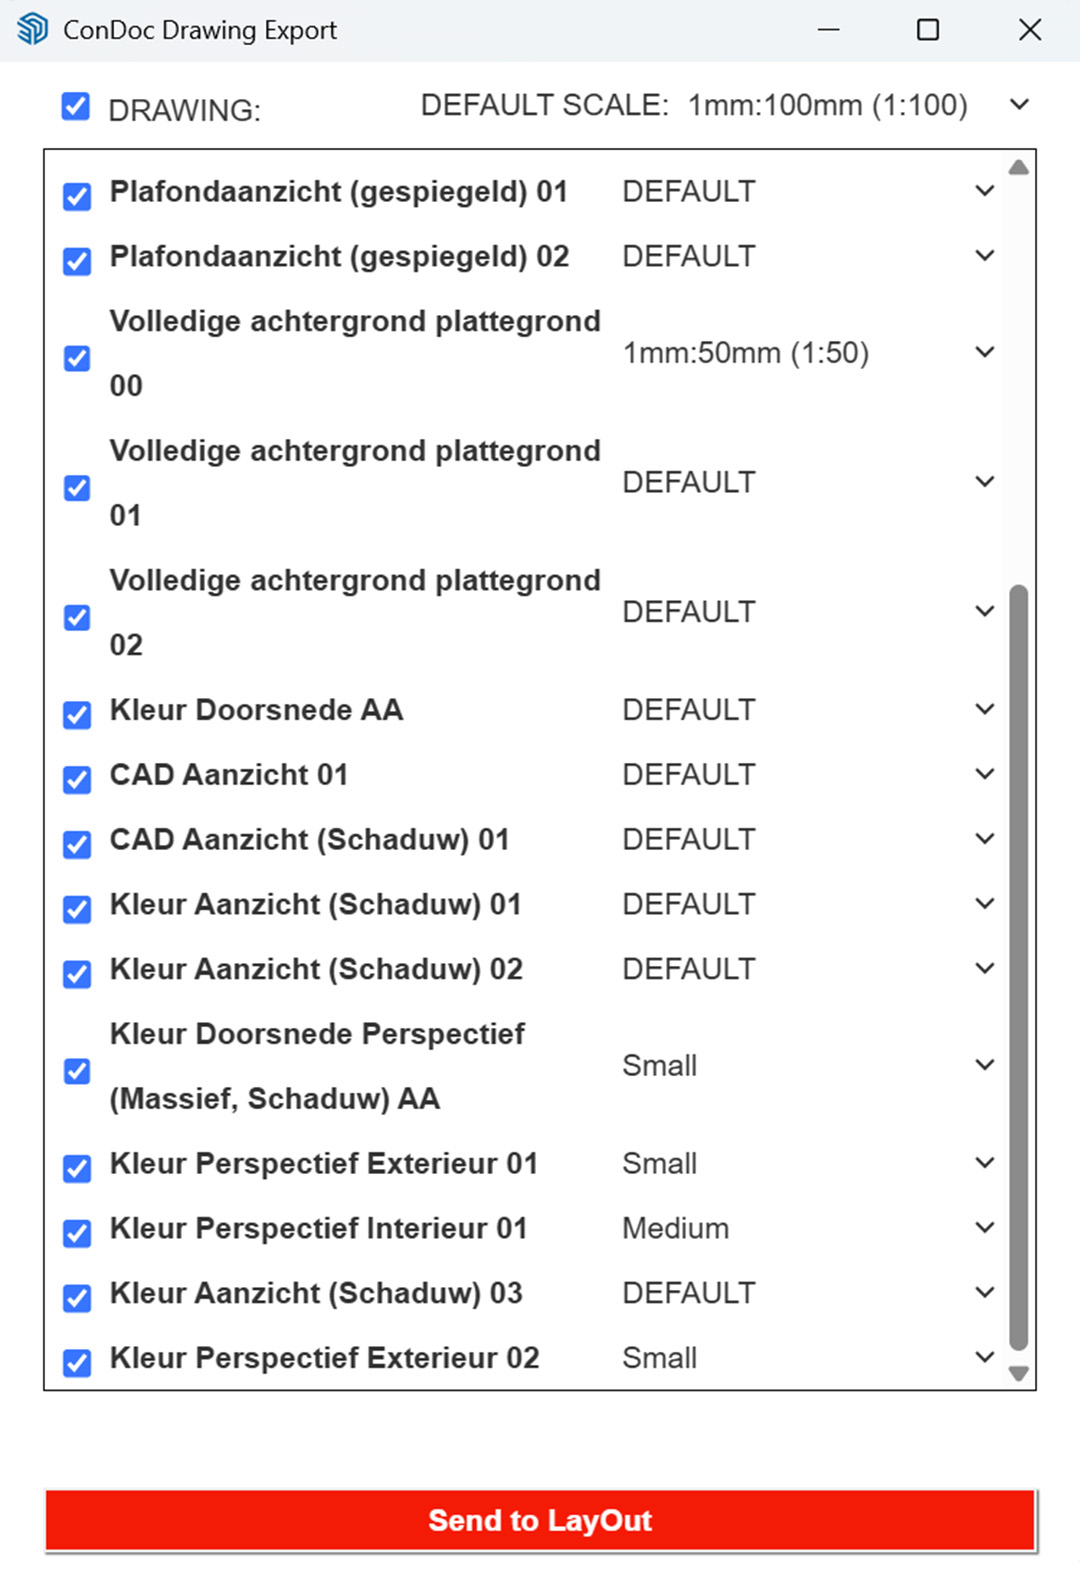
Martha: Sending to LayOut
I click the Drawing Export button.

A window appears where I choose which drawings to send to LayOut. I want all of them, so I tick the checkbox in the top left. Then I set the default scale for the project.
For individual drawings, I make exceptions where needed.
Once everything is set, I click ‘Send to Layout’. This step takes a moment, so I grab a coffee. Five minutes later, it’s done, and I carry on in LayOut. Note: LayOut does not open automatically!
Martha is done in SketchUp!
SketchUp – Step 8
Orlando: Sending the model to LayOut
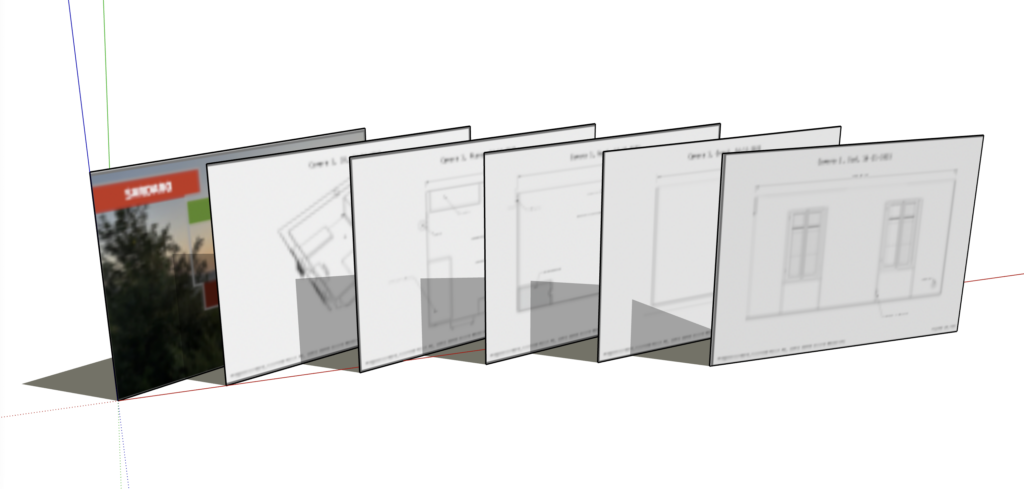
Using File > Send to LayOut, I send the completed 3D model to LayOut to create scaled, well-presented 2D drawings with dimensions and annotations.
Martha was already done at step 7!
LayOut – Step 1
Orlando: Choosing a template
I don’t do this often enough to have built my own template, so I usually pick one that fits my project’s style.
Martha: Choosing a template
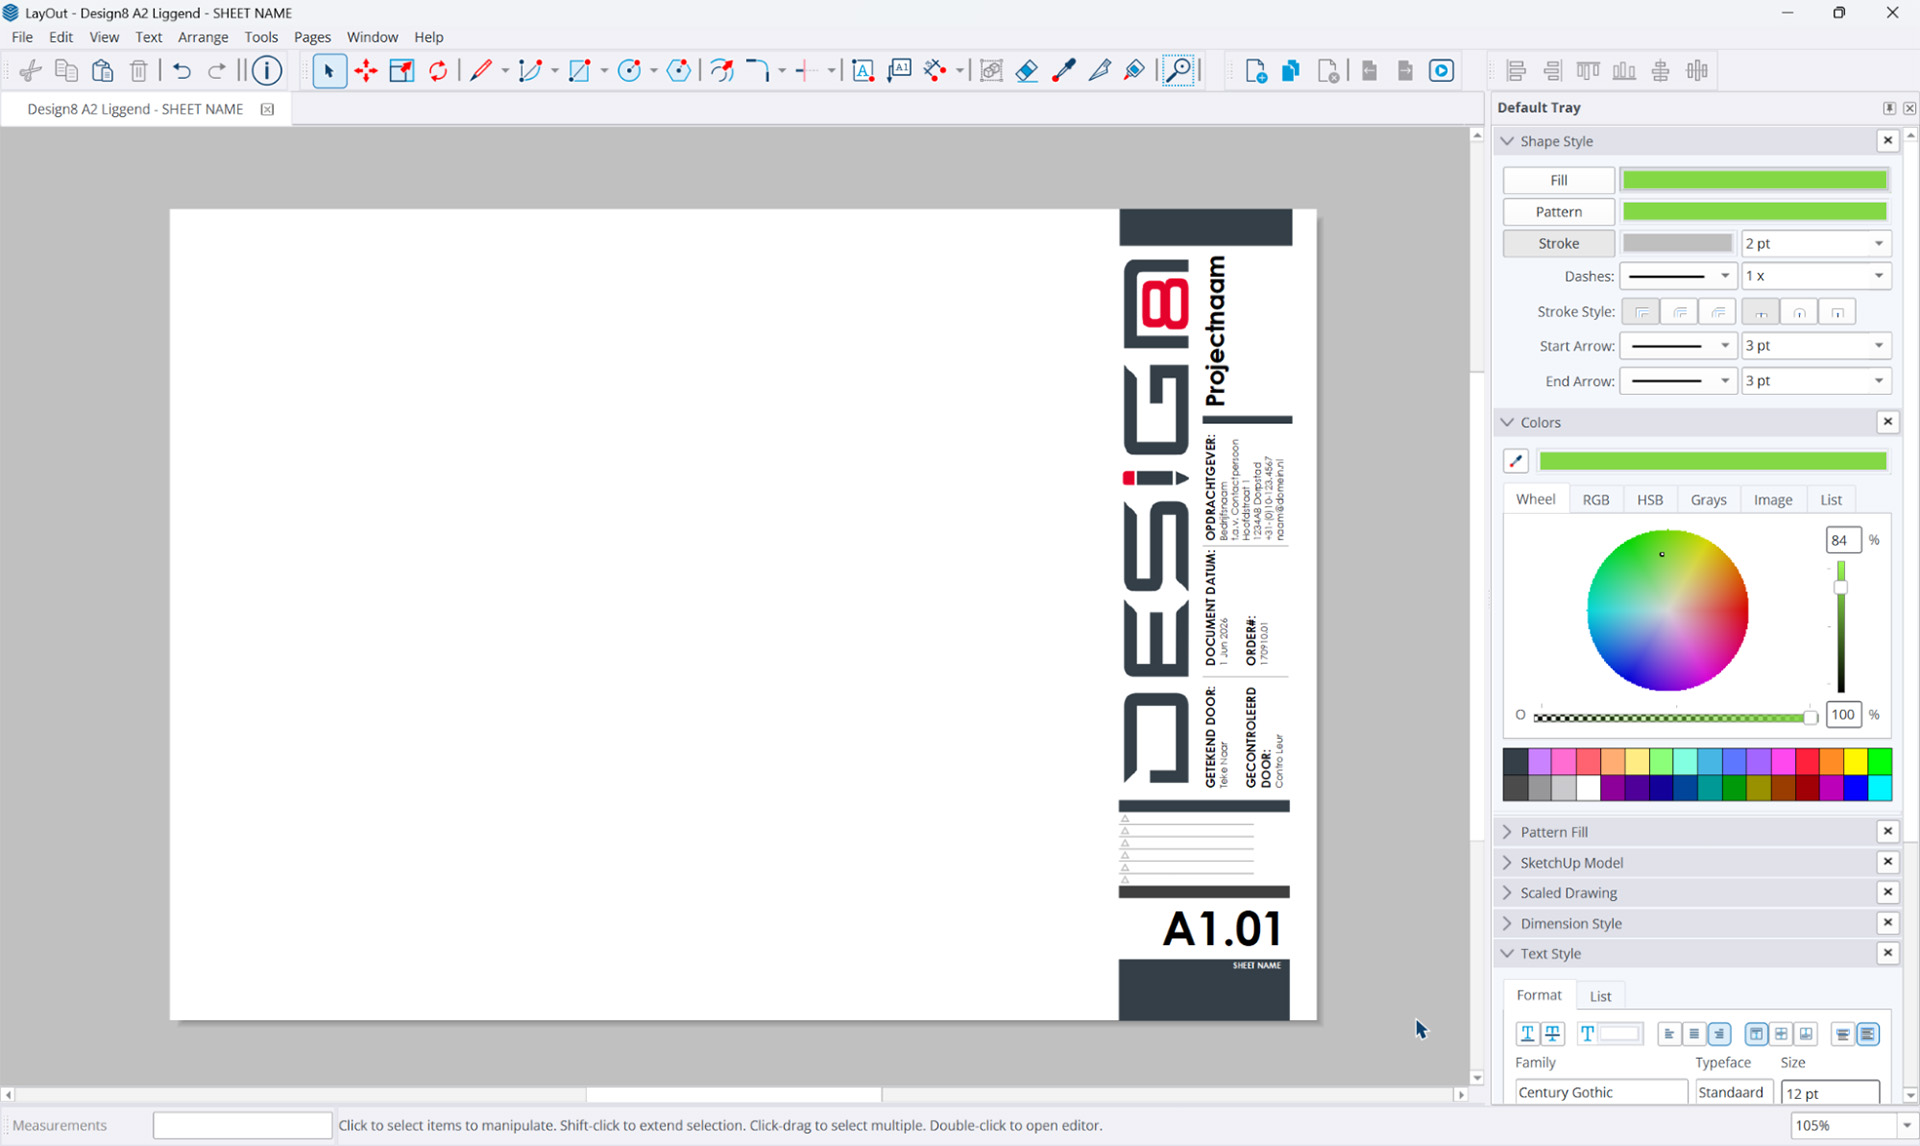
When you install ConDoc Tools, you also get a set of ready-made templates to choose from: A0, A1, A2… and much more. They appear under ‘My Templates’.
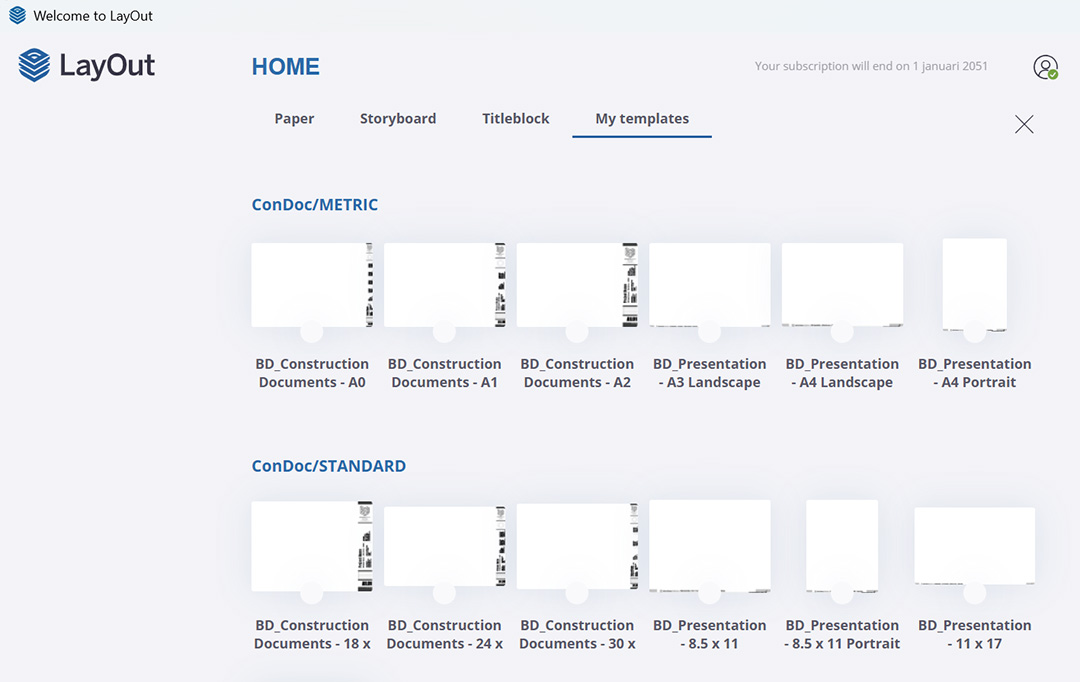
I’ve created my own template based on one of the ConDoc templates, with our own logo, and that’s the one I use:
LayOut – Step 2
Orlando: Filling in fixed project details
LayOut has a smart Auto-Text feature for quickly entering the date, client name, project name and so on. Details that can then be reused throughout the entire document, appearing on every page of the template if you like.
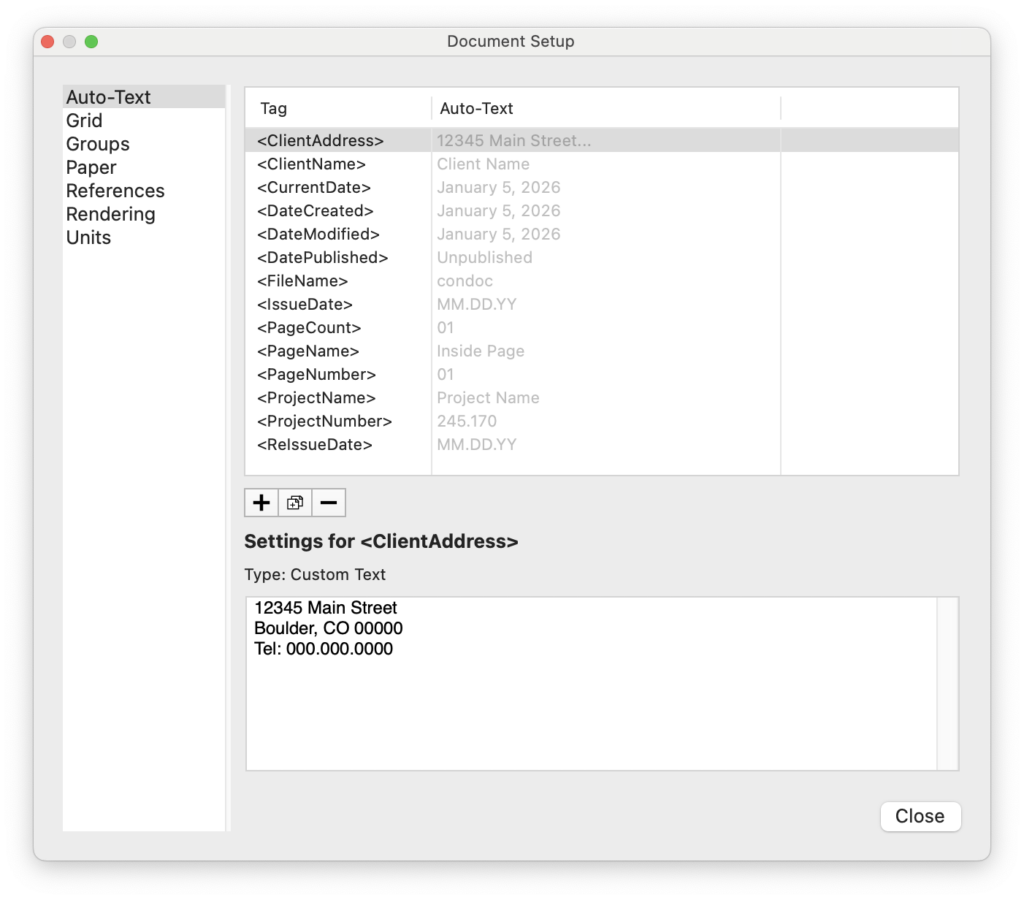
Martha: Filling in fixed project details
In LayOut, I fill in the Auto-Text fields so this information appears automatically throughout my document. Same as Orlando’s approach.
LayOut – Step 3
Orlando: Setting the correct scene
I right-click on the SketchUp viewport and choose the right room from the list of scenes. The alignment and scale are visible immediately.
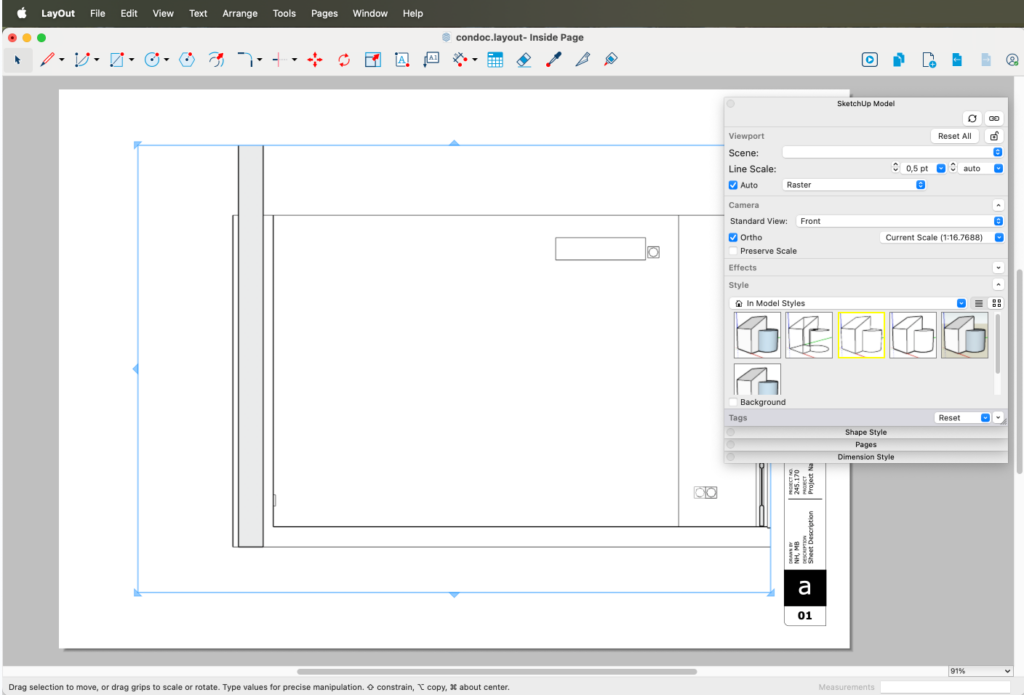
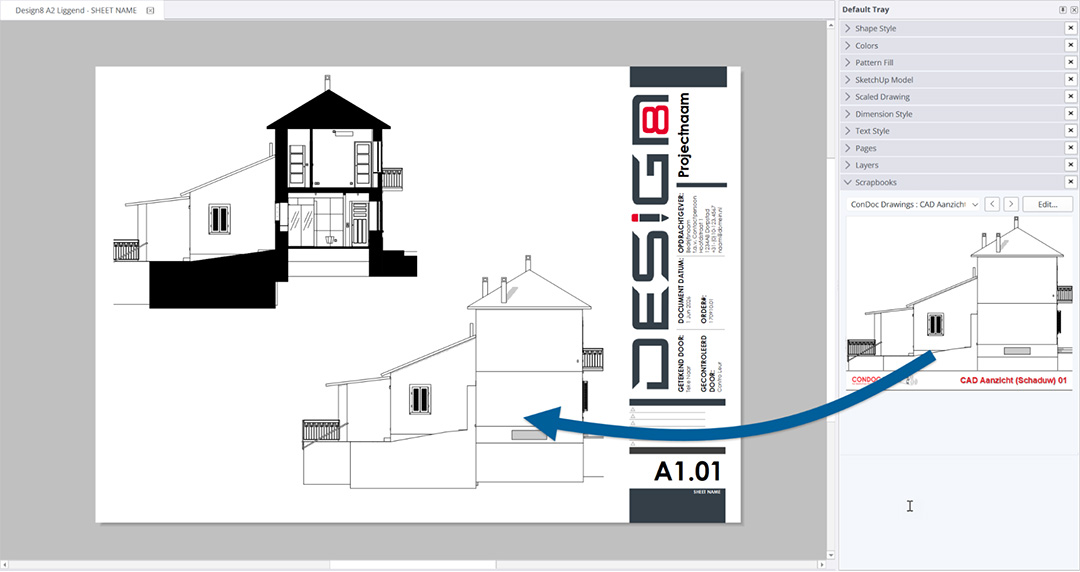
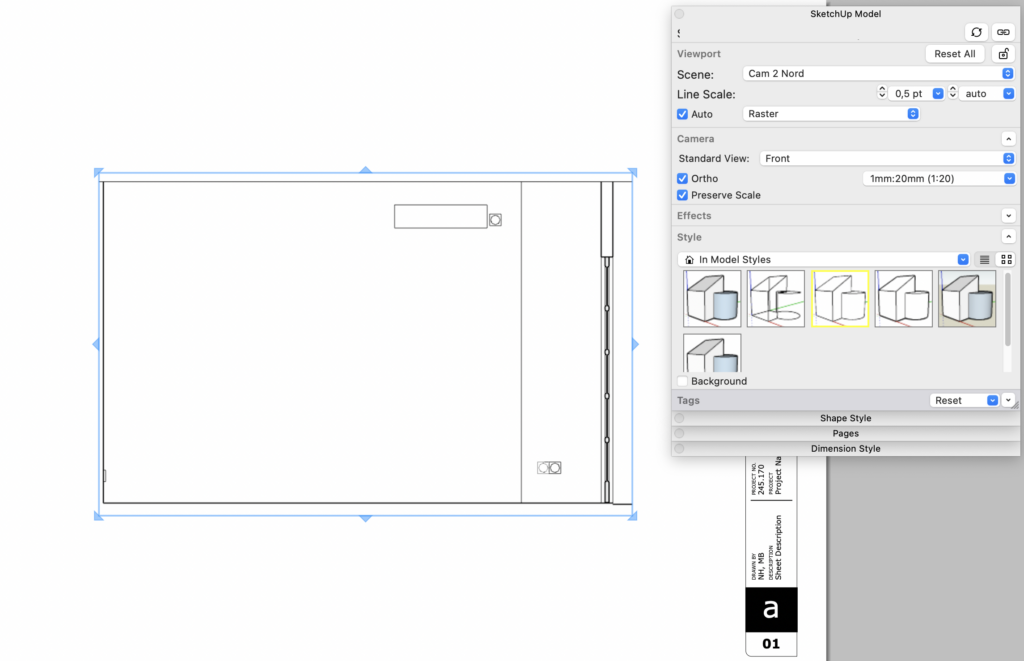
Martha: Dragging viewports onto the page
When I’ve exported my drawings through ConDoc Tools, they arrive as Views in a Scrapbook called ‘ConDoc Drawings’. This scrapbook is overwritten every time you do a new export, so make sure your final drawing is properly finished before exporting.
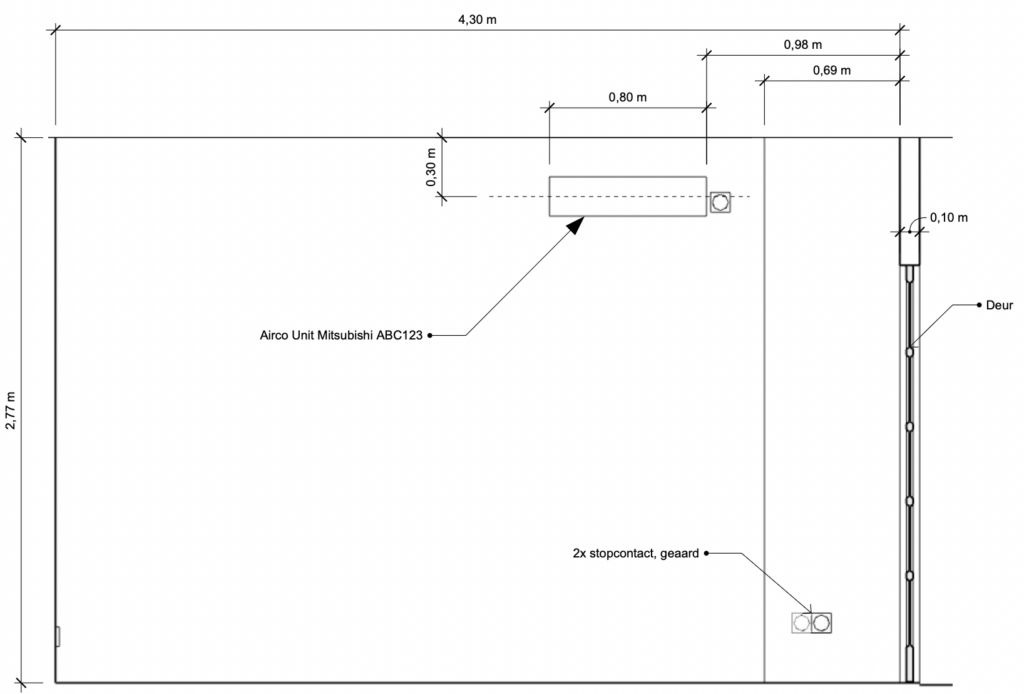
From the Scrapbook, I drag all the drawings into my document. In this case, I choose to place an elevation and a section from the same side of the building side by side:
LayOut – Step 4
Orlando: Setting the correct scale
The scale is close, but needs a small adjustment. I go with 1:20.
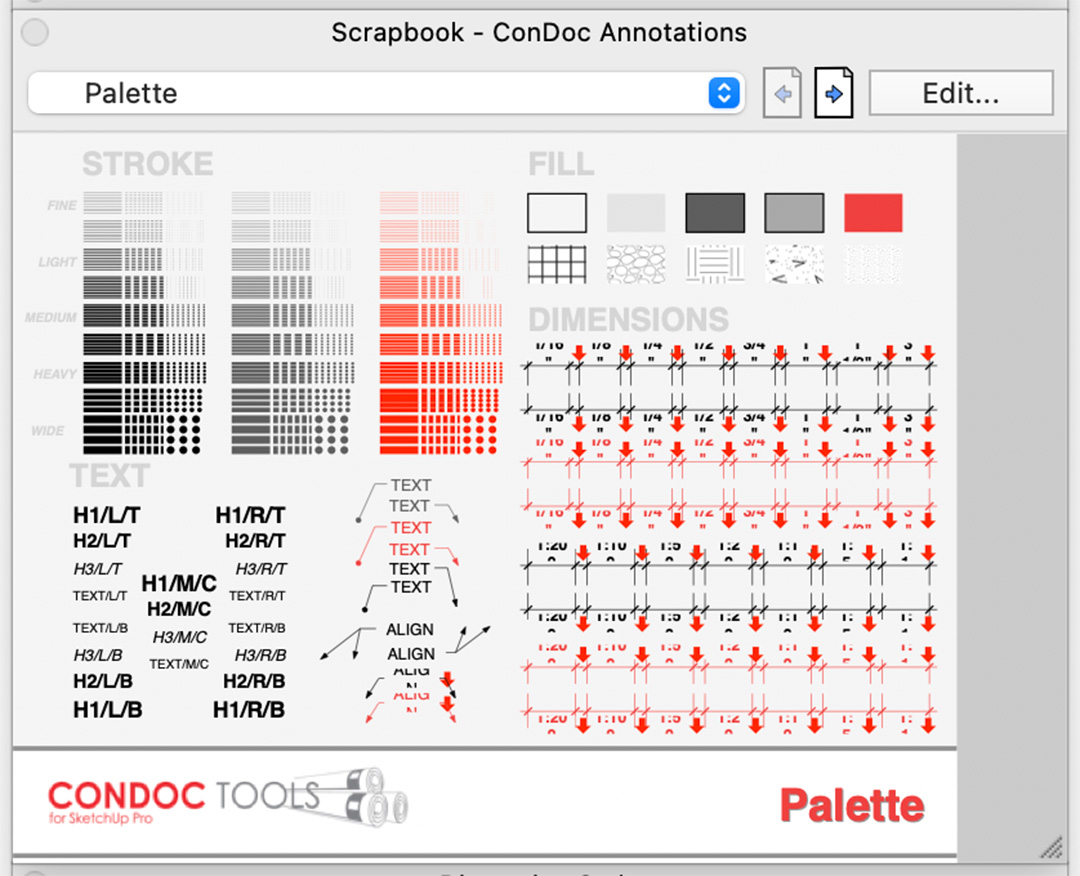
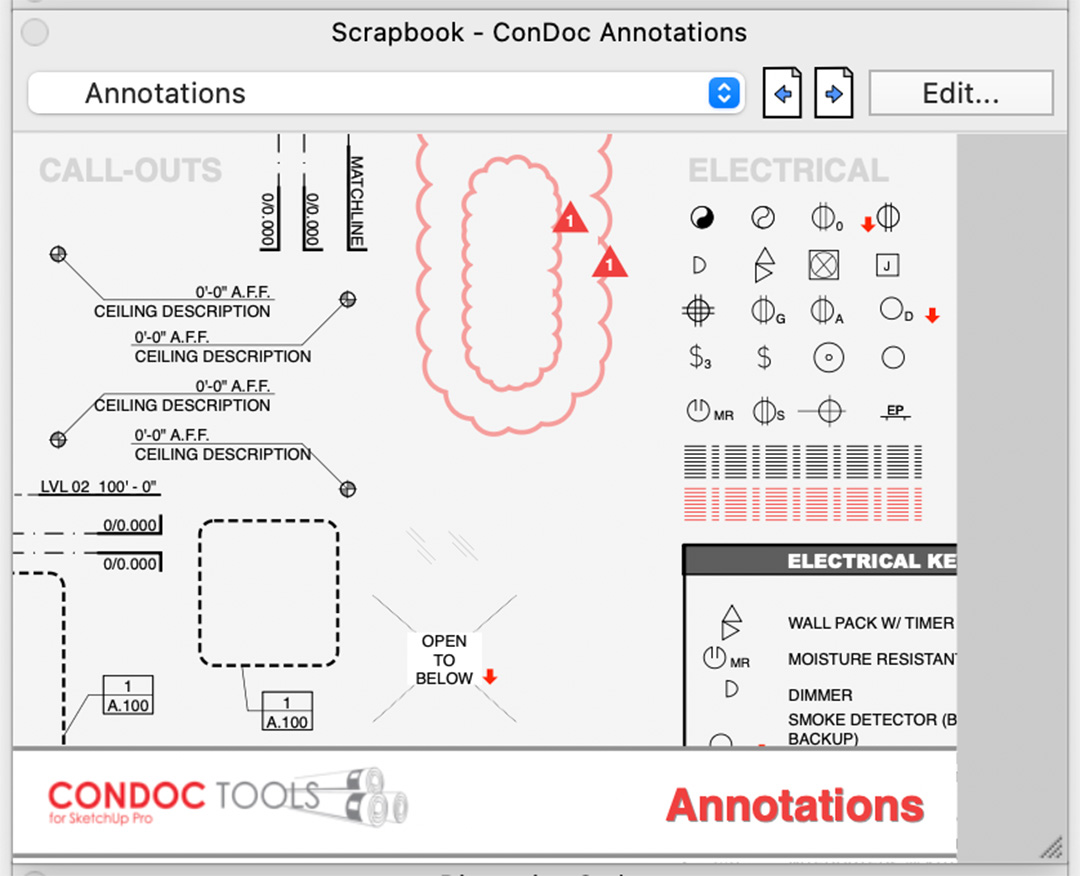
Martha: Placing annotations
Now I can start adding the necessary annotations. ConDoc Tools already includes a wide range of annotations, so there’s plenty to choose from.
LayOut – Step 5
Orlando: Setting the correct crop
I trim the viewport a little and centre it on the page. I need to make sure Preserve Scale is on, or the scale will shift, though in this case, it happened automatically when I selected 1:20.
Martha: Adding a new page
Once I’m happy with my first page, I add new pages for the remaining ConDoc Tools views.
- Add a page
- Browse the ConDoc Tools Scrapbook to the next view
- Drag new View(s) onto the page and add any necessary annotations
This is how I build up a complete presentation quickly using ConDoc Tools.
Martha is done in LayOut!
LayOut – Step 6
Orlando: Placing annotations
Now it’s time to add annotations.
Martha was already done at step 5!
LayOut – Step 7
Orlando: Placing annotations
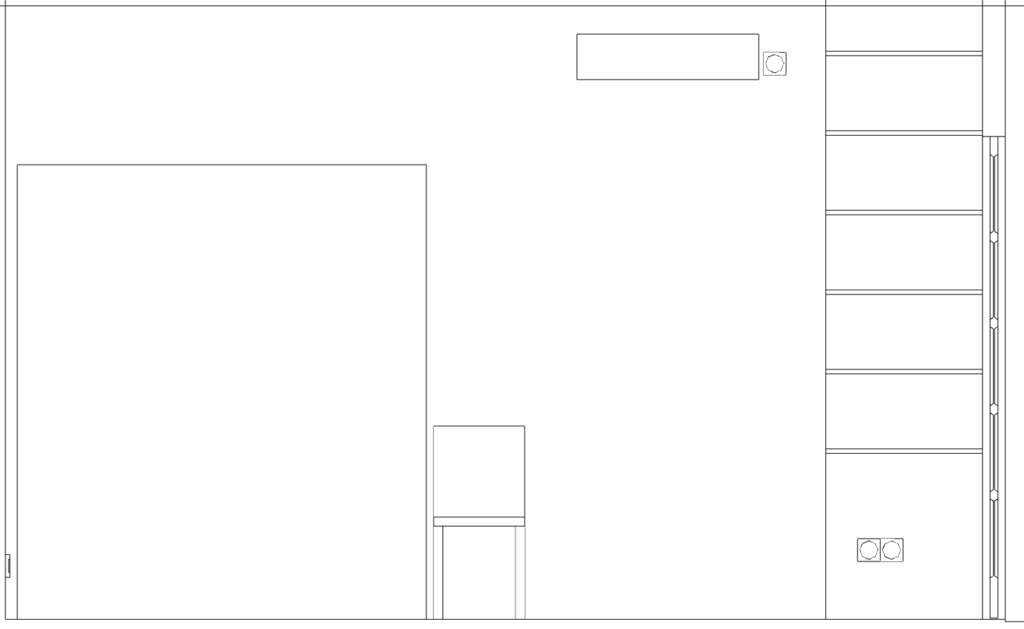
While annotating, I notice that the sockets in this room aren’t all at the same height. I fix this in the 3D model and sync the change back to LayOut:
- Update the SketchUp model
- Save the file
- In LayOut, right-click on any SketchUp viewport
- Select the command Update Model Reference
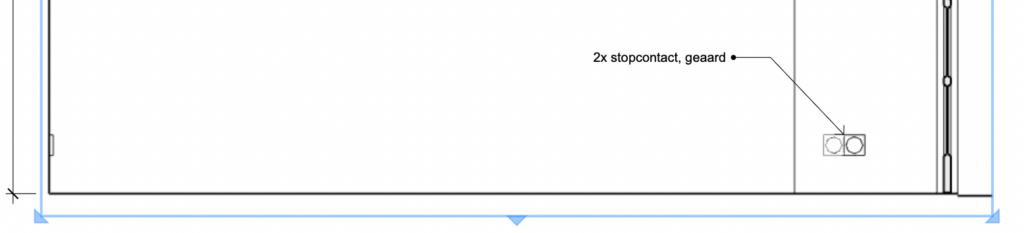
LayOut updates the viewport automatically, and the label arrow follows.
Martha was already done at step 5!
LayOut – Step 8
Orlando: Adding a new page
I’m done with this view and now I’m creating a new page for a different wall. My workflow:
- Duplicate the existing page
- Select a new scene
- Remove the old annotations
- Place new annotations
I repeat this step several times, one page per required view, until I have a document with a full overview. I might also add title pages for each room.
Martha was already done at step 5!
How long did it take?
Orlando: All in all, this took me 6 hours, after the 3D model was already finished. I’m curious to hear how long Martha took, and what her results look like!
Martha: All in all, it took me about 2.5 hours. I’m naturally a bit faster than Orlando to begin with, but ConDoc Tools shaved time off almost every single step. Most of the time went into setting up the Tags and Styles correctly, and that’s a one-time investment that pays off in every project that follows. And for a designer, consistency matters: my results are always perfectly consistent.